When it comes to maximizing your performance on the slopes, knowing how to wax a snowboard is an essential skill every rider should master. Whether you’re a seasoned shredder or a beginner hitting the powder for the first time, a well-waxed snowboard can make all the difference in your speed, control, and overall ride quality.
But let’s face it—waxing your snowboard can seem intimidating if you’ve never done it before. Don’t worry, though! In this guide, we’ll break down the process step-by-step, sharing expert tips and tricks to ensure your board glides effortlessly and stays in peak condition all season long. Ready to elevate your snowboarding game? Let’s dive in!
Choosing The Right Wax
Waxing your snowboard keeps it smooth and fast on the slopes. But choosing the right wax can be tricky. The right wax makes a huge difference in performance. Let’s dive into the types of waxes you can use.
Temperature-specific Waxes
Temperature-specific waxes are designed for different snow temperatures. These waxes ensure your snowboard performs well in varying conditions. They come in three main types:
- Cold Wax: Best for temperatures below 14°F (-10°C).
- Warm Wax: Ideal for temperatures above 24°F (-4°C).
- All-Temperature Wax: Works best between 14°F and 24°F (-10°C to -4°C).
Using the correct temperature-specific wax enhances your snowboard’s glide. It reduces friction, allowing you to move smoothly over the snow. Here’s a quick reference table:
| Type | Temperature Range |
|---|---|
| Cold Wax | Below 14°F (-10°C) |
| Warm Wax | Above 24°F (-4°C) |
| All-Temperature Wax | 14°F to 24°F (-10°C to -4°C) |
Universal Waxes
Universal waxes are versatile and can be used in a range of conditions. They are ideal if you snowboard in various temperatures. Universal waxes save you time and effort as you don’t need to switch waxes often.
Benefits of using universal waxes:
- Convenience: Suitable for different snow conditions.
- Cost-effective: You only need one type of wax.
- Easy to apply: No need for multiple waxes.
Universal waxes are great for beginners and casual snowboarders. They provide decent performance without the hassle of temperature-specific waxes.
Fluorinated Waxes
Fluorinated waxes contain fluorocarbons, which repel water and reduce friction. They are perfect for competitive snowboarders who need top performance. Fluorinated waxes come in low, medium, and high levels of fluorination.
Key benefits include:
- Enhanced Speed: Reduces drag and increases speed.
- Better Glide: Provides a smooth ride on wet and slushy snow.
- Long-lasting: Stays effective for a longer period.
Fluorinated waxes can be more expensive but offer superior performance. They are best for those seeking maximum speed and efficiency.
Preparing The Snowboard
Waxing your snowboard is vital for a smooth ride and better performance on the slopes. But before you can start waxing, you need to prepare your snowboard properly. This ensures the wax adheres well and lasts longer. Let’s dive into the steps of preparing your snowboard for waxing.
Cleaning The Base
To start, you need to clean the base of your snowboard. This removes dirt, old wax, and other debris. A clean base ensures the new wax bonds well.
Here are the steps to clean the base:
- Brush the Base: Use a nylon brush to remove loose dirt and old wax.
- Scrape the Base: Use a plastic scraper to remove any stubborn wax or dirt.
- Check for Damage: Look for any deep scratches or gouges. Repair these before waxing.
Cleaning the base is crucial. A dirty base prevents the new wax from sticking properly. This makes your snowboard slower and less responsive.
Applying Base Cleaner
After cleaning the base, apply a base cleaner. This removes any remaining residue and prepares the surface for new wax.
Follow these steps to apply base cleaner:
- Choose the Right Cleaner: Use a cleaner specifically designed for snowboards.
- Apply the Cleaner: Spray or pour a small amount of cleaner on the base.
- Wipe the Base: Use a clean cloth to wipe the base in a circular motion.
- Let it Dry: Allow the base to dry completely before applying new wax.
Using a base cleaner is an important step. It ensures no old wax or dirt remains, giving you a smooth and fast ride. Make sure to use a cleaner that’s safe for your snowboard’s material.
Waxing Process
Waxing your snowboard is essential for smooth rides and maintaining your board’s longevity. The waxing process involves several steps to ensure optimal performance. Below, we break down the key steps: applying the wax, using a waxing iron, and scraping the excess wax.
Applying The Wax
Applying wax to your snowboard is a crucial step in the waxing process. First, ensure your board is clean and dry. Any dirt or moisture can hinder the wax’s effectiveness. Use a brush or cloth to remove any debris.
Next, choose the right wax based on the snow conditions. There are different types of waxes for various temperatures:
- Warm Temperature Wax: Best for temperatures above 28°F (-2°C).
- All-Temperature Wax: Suitable for most conditions.
- Cold Temperature Wax: Ideal for temperatures below 28°F (-2°C).
After selecting the appropriate wax, hold it against the base of your snowboard and rub it gently. This ensures an even distribution before you start melting it. Remember to cover the entire base, including the edges.
Here’s a quick table to help you decide which wax to use:
| Temperature | Type of Wax |
|---|---|
| Above 28°F (-2°C) | Warm Temperature Wax |
| All Conditions | All-Temperature Wax |
| Below 28°F (-2°C) | Cold Temperature Wax |
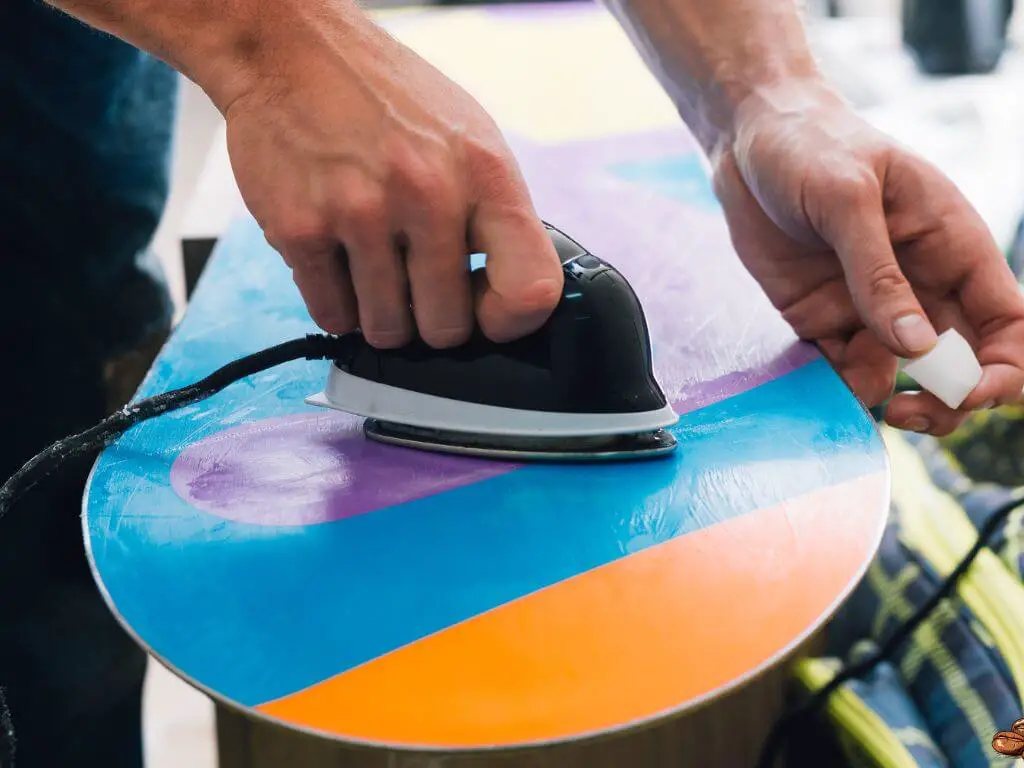
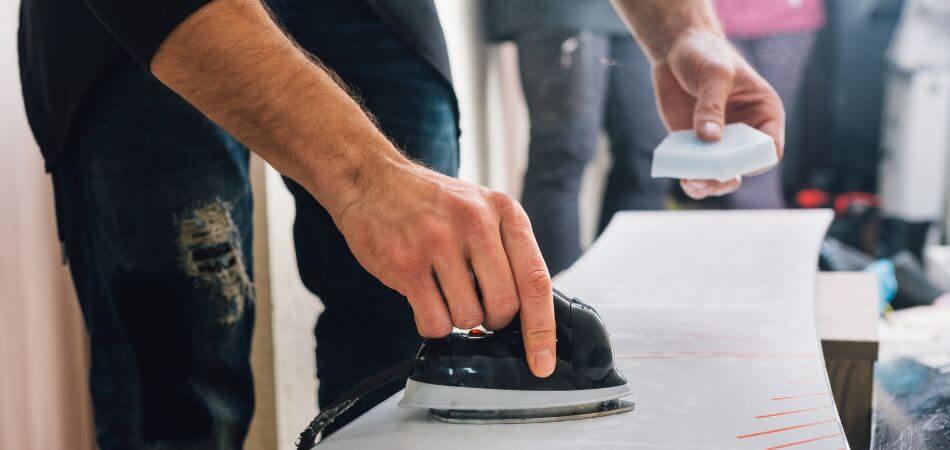
Using A Waxing Iron
A waxing iron is vital for melting and spreading the wax evenly. Set your iron to a medium temperature, around 120-140°F (50-60°C). Avoid using a regular clothing iron, as it can damage the base of your snowboard.
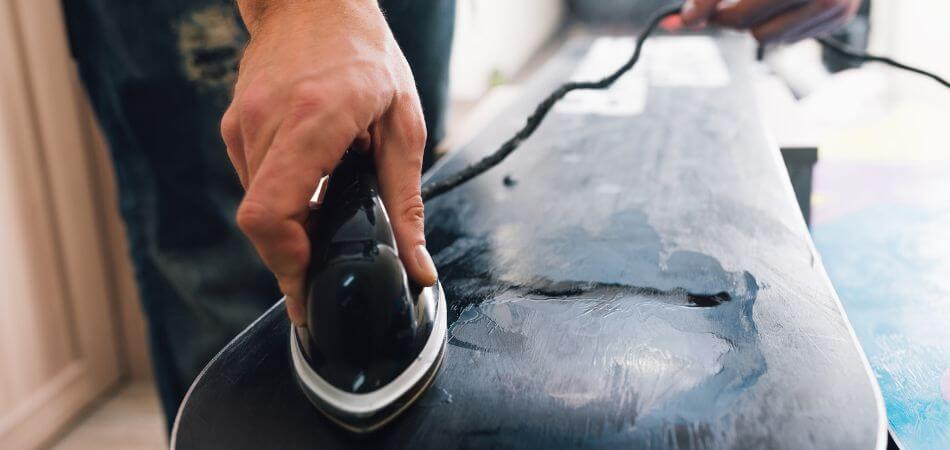
Hold the waxing iron above the snowboard and let the wax drip onto the base. Move the iron slowly in a circular motion to spread the wax evenly. Ensure every part of the base gets covered.
Here are some tips for using the waxing iron:
- Keep the iron moving to avoid burning the base.
- Do not overheat the wax. It should be melted, not smoking.
- Use gentle pressure to ensure the wax penetrates the base.
This process should take about 10-15 minutes. The goal is to create a smooth, even layer of wax across the entire base of the snowboard. Allow the wax to cool and harden for at least 30 minutes before moving to the next step.
Scraping The Excess Wax
Once the wax has cooled, it’s time to scrape off the excess. Use a plastic scraper designed for snowboards. Start at the nose and scrape towards the tail. Apply firm, even pressure to remove the excess wax.
Here are the steps to follow:
- Hold the scraper at a slight angle.
- Use long, continuous strokes from nose to tail.
- Focus on removing all the excess wax, especially along the edges.
After scraping, use a nylon brush to buff the base. This helps remove any remaining wax particles and smoothens the surface. Brush from nose to tail in long, even strokes.
Lastly, use a soft cloth to wipe down the base. This final step ensures your snowboard is ready for optimal performance on the slopes.
Regular waxing keeps your snowboard in top condition, providing better glide and control on the snow. Follow these steps to enjoy a smoother ride and prolong your board’s lifespan.
Buffing And Polishing
Waxing your snowboard is crucial for maintaining its performance. After applying wax, the next steps are buffing and polishing. These steps ensure a smooth, fast ride on the slopes. Buffing and polishing give your board a sleek finish and improve its glide. This guide will walk you through the process.
Buffing The Base
Buffing the base smooths out the wax. It helps the wax to adhere better and makes your board faster. Follow these steps for optimal results:
- Let the Wax Cool: Allow the wax to cool for at least 30 minutes. This step is crucial for proper adhesion.
- Scrape Off Excess Wax: Use a plastic scraper to remove the extra wax. Hold the scraper at a 45-degree angle and push it from nose to tail.
- Use a Nylon Brush: Brush the base using a nylon brush. This step helps to remove any remaining wax particles.
- Circular Motion: Buff the base in a circular motion. This ensures even coverage and smoothness.
Buffing can make a huge difference in your snowboard’s performance. A well-buffed base is essential for a smooth ride.
| Tool | Purpose |
|---|---|
| Plastic Scraper | Remove excess wax |
| Nylon Brush | Buff the base |
Polishing The Base
Polishing the base gives your snowboard a sleek, shiny finish. It also enhances the glide and speed. Here’s how to polish your snowboard:
- Use a Horsehair Brush: Start with a horsehair brush. This brush helps to smooth out the wax and add shine.
- Brush in One Direction: Always brush from nose to tail. This technique ensures a smooth finish.
- Fibertex Pad: Use a Fibertex pad for the final touch. It adds an extra layer of polish and smoothness.
Polishing not only makes your board look good but also improves its performance. A polished base glides effortlessly on snow.
For best results, repeat the polishing process until you achieve the desired shine. Your snowboard is now ready for the slopes!
| Tool | Purpose |
|---|---|
| Horsehair Brush | Add shine and smoothness |
| Fibertex Pad | Final touch for extra polish |
Final Touches
Waxing your snowboard regularly ensures a smooth ride on the slopes. The process doesn’t end with applying the wax. The final touches are crucial for a perfect finish. They include removing excess wax and checking for smoothness.
Removing Wax Residue
After applying and letting the wax cool, it’s time to remove the excess. This step is essential for a smooth glide. Use a plastic scraper to scrape off the extra wax. Hold the scraper at a 45-degree angle. Work from the nose to the tail. Make sure to scrape evenly.
Here are the steps to follow:
- Hold the scraper at a 45-degree angle.
- Start from the nose and move to the tail.
- Scrape evenly to remove excess wax.
- Wipe the snowboard with a clean cloth.
After scraping, use a nylon brush to polish the base. Brush from nose to tail in long, even strokes. This removes fine wax particles and opens up the structure of the base.
For a final polish, use a horsehair brush. This step ensures the base is smooth and ready for the slopes. Your snowboard should now have a shiny, smooth finish.
Checking For Smoothness
After removing the wax residue, the next step is checking for smoothness. Run your hand along the base. It should feel smooth and even. Look for any rough spots or areas where the wax is uneven.
Here are some tips for checking smoothness:
- Run your hand along the base.
- Feel for any rough or uneven spots.
- Use a fine brush if needed to smooth out these areas.
If you find any rough spots, use a fine brush or soft cloth to smooth them out. A well-waxed snowboard should feel like glass. This ensures a fast and smooth ride on the slopes.
Now, your snowboard is ready for action. Remember, regular waxing keeps your board in top condition. Enjoy your ride!
Storing The Snowboard
Waxing a snowboard is essential for maintaining its performance and longevity. But storing it properly after waxing is just as crucial. Proper storage ensures your snowboard remains in top condition, ready to hit the slopes when the next season arrives.
Protecting The Base
After waxing your snowboard, protecting the base is vital to keep it in good shape. The base is the part that makes contact with the snow, so it needs special care. Follow these steps to protect the base:
- Apply a generous coat of wax: Ensure the base is fully covered with wax. This layer acts as a protective shield against dust and moisture.
- Leave the wax on: Do not scrape off the wax before storing. The wax serves as a barrier, preventing the base from drying out.
- Use a snowboard bag: Store your snowboard in a padded bag. This will protect it from scratches and damage.
- Check for damage: Inspect your board for any cracks or chips. Repair these issues to prevent further damage during storage.
By following these steps, you ensure that your snowboard’s base remains in excellent condition. This reduces the need for extensive maintenance and repairs in the future.
Storing In A Cool Place
Where you store your snowboard affects its longevity. A cool, dry place is ideal for storage. Here’s why:
- Avoid extreme temperatures: Heat can cause the wax to melt and the base to warp. Cold temperatures can make the materials brittle.
- Keep it dry: Moisture can lead to rust on the edges and mold on the bindings. Store your snowboard in a dry place to prevent this.
- Ventilation is key: Good air circulation helps prevent moisture buildup. Avoid storing your snowboard in a sealed space.
Consider these tips for finding the perfect storage spot:
| Storage Place | Reason |
|---|---|
| Garage | Cool and dry, with good ventilation. |
| Closet | Protected from dust and moisture. |
| Basement | Ensure it’s dry and well-ventilated. |
By storing your snowboard in the right conditions, you preserve its quality and ensure it’s ready for your next adventure.
Maintenance Tips
Waxing your snowboard regularly keeps it in top shape. It ensures smooth gliding on the slopes and extends the life of your board. Here are some essential maintenance tips for waxing a snowboard.
Regular Waxing Schedule
Maintaining a regular waxing schedule is crucial for keeping your snowboard’s performance at its peak. Depending on your usage, you should wax your board:
- Every 3-5 days of riding if you are an avid snowboarder.
- Every 7-10 days if you ride occasionally.
- At the start and end of the season regardless of usage.
Regular waxing fills in the microscopic pores in the base of your snowboard, providing a smooth surface. This not only helps in better gliding but also protects the base from damage. To keep track of your waxing schedule, consider creating a simple table:
| Usage Frequency | Waxing Frequency |
|---|---|
| Frequent (3-5 days/week) | Every 3-5 days |
| Occasional (1-2 days/week) | Every 7-10 days |
| Seasonal (few times a season) | Start and End of Season |
Sticking to this schedule ensures your snowboard is always ready for action.
Avoiding Over-waxing
While regular waxing is essential, over-waxing can be detrimental. Over-waxing can lead to wax buildup, making your board sticky and slow. Here are some signs of over-waxing:
- Excess wax visible on the base even after scraping.
- Your board feels sticky on the slopes.
- Wax starts to flake off during your ride.
To avoid over-waxing, ensure you scrape off the excess wax thoroughly after each waxing session. Use a plastic scraper and make sure you get all the wax off. Additionally, you should use a nylon brush to polish the base, removing any remaining wax particles.
Another key point is to match the wax with the snow conditions. Using the right wax type for the temperature and snow conditions helps prevent unnecessary buildup. Here’s a quick guide:
| Snow Condition | Recommended Wax |
|---|---|
| Cold Snow (-15°C to -5°C) | Cold Wax |
| Warm Snow (-5°C to 0°C) | Warm Wax |
| All Conditions | Universal Wax |
By avoiding over-waxing and using the right wax, your snowboard will perform better and last longer.
Conclusion And Recap
Waxing a snowboard is crucial for maintaining its performance and longevity. This guide walks you through the steps, ensuring your board glides smoothly on the snow. Here is a conclusion and recap of the process, focusing on the benefits of proper waxing and a summary of the steps involved.
Benefits Of Proper Waxing
Proper waxing offers numerous benefits for your snowboard. It enhances your snowboarding experience and prolongs the life of your board. Here are some key benefits:
- Improved Speed: Waxing reduces friction between the board and the snow, allowing for faster rides.
- Better Control: A well-waxed board provides better edge control, making it easier to maneuver.
- Increased Durability: Waxing protects the base from scratches and damage, extending the board’s lifespan.
- Smoother Ride: It ensures a smoother, more enjoyable ride by preventing the board from sticking to the snow.
Proper waxing also helps in maintaining the snowboard’s base. A dry base can lead to cracks and damage. Regular waxing keeps the base hydrated and in good condition. This simple maintenance step can save you from costly repairs and replacements.
Summary Of Steps
Waxing a snowboard involves several steps. Here is a summary to help you remember the process:
- Clean the Base: Remove old wax and dirt using a scraper and a base cleaner.
- Choose the Wax: Select a wax suitable for the current snow conditions.
- Heat the Wax: Melt the wax using a waxing iron and drip it onto the board.
- Spread the Wax: Iron the wax evenly across the base, ensuring complete coverage.
- Let it Cool: Allow the wax to cool and harden for at least 30 minutes.
- Scrape off Excess Wax: Use a plastic scraper to remove the excess wax, leaving a thin layer on the base.
- Brush the Base: Use a nylon brush to polish the base and remove any remaining wax particles.
Following these steps ensures your snowboard remains in peak condition. Regular waxing keeps your board fast, smooth, and ready for any adventure. Remember, a well-maintained board not only enhances performance but also provides a safer and more enjoyable ride.
Frequently Asked Questions
Can You Wax A Snowboard At Home?
Yes, you can wax a snowboard at home. You need an iron, wax, scraper, and brush. Melt the wax, apply, let cool, then scrape and brush.
Can I Just Rub Wax On My Snowboard?
No, you shouldn’t just rub wax on your snowboard. You need to clean the base, apply wax evenly, and then scrape and buff it for best performance.
How Often Do You Need To Wax A Snowboard?
Wax a snowboard every 3-5 outings for optimal performance. Frequent riders should wax more often. Check the base regularly.
How Do You Know If Your Snowboard Needs Wax?
Your snowboard needs wax if it feels slow or sticky. Check for a dry, white base. Inspect for uneven wear. Regular waxing ensures smooth rides and better performance.
Conclusion
Waxing a snowboard is essential for performance and longevity. Follow these steps for a smoother, faster ride. Regular maintenance ensures your board stays in top condition. Embrace the process and enjoy enhanced performance on the slopes. Keep your snowboard ready for action and make the most of every run.